Yoga for Wrist Sensitivity: A Practical Guide to Selecting Classes
Choose accessible class formats, communicate with instructors, and modify poses to maintain a sustainable, comfortable yoga practice.
https://primetempr.com/blog/wrist-sensitive-yoga-a-practical-guide-to-finding-the-right-
Wrist discomfort often arises in standard, fast-paced yoga classes that rely on weight-bearing poses. Movements like Downward-Facing Dog, Plank, and Chaturanga place significant pressure on the wrist joint, which can aggravate existing sensitivity.
Wrist sensitivity does not require you to abandon yoga. Select class formats that prioritize vertical alignment or seated movement and communicate your needs to the instructor. Yoga styles and demands vary; qualified instruction and appropriate modification can reduce avoidable risk.
Understanding wrist-friendly yoga
A "wrist-friendly" class minimizes the time you spend with your hands on the floor supporting your body weight. In many traditional vinyasa or power yoga classes, the repetitive transition from standing to the floor and back again creates a high volume of wrist-loading.
Focus on formats centered on standing, seated, or supine postures. Removing the requirement to bear weight through your hands allows you to experience the benefits of movement, balance, and breathwork without associated joint strain.
Class formats to prioritize
Not all "gentle" classes are created equal. Some slow-paced sessions may still include floor-based sequences that require wrist support. To ensure your practice remains accessible, look for these specific formats:
- Chair Yoga: These classes are designed to be performed entirely or mostly while seated in a chair. They are excellent for maintaining mobility and strength without ever needing to place weight on your hands. Find an accessible class or learn more in our Chair Yoga for Beginners: A Practical Guide.
- Standing Yoga: These sessions keep you on your feet, focusing on balance, leg strength, and spinal mobility. Because you are not transitioning to the floor, the wrists remain neutral throughout the session. Read more about What to Expect From a Standing Yoga Class.
- Restorative Yoga: While some restorative poses are floor-based, they rarely involve weight-bearing. The focus is on using props to support the body in stillness, which is generally very low-impact on the wrists.
How to vet a studio or teacher
Finding the right instructor is more effective than reading generic class descriptions. Use Prime Tempr's trainer and location profiles to compare formats and contact businesses to confirm accessibility details that matter to you.
Before booking a class, consider these steps:
- Check the profile: Look for instructors who emphasize "accessible," "therapeutic," or "functional" movement.
- Contact the studio: Reach out via email or phone. Ask specifically: "I have wrist sensitivity; does this instructor provide modifications for weight-bearing poses?"
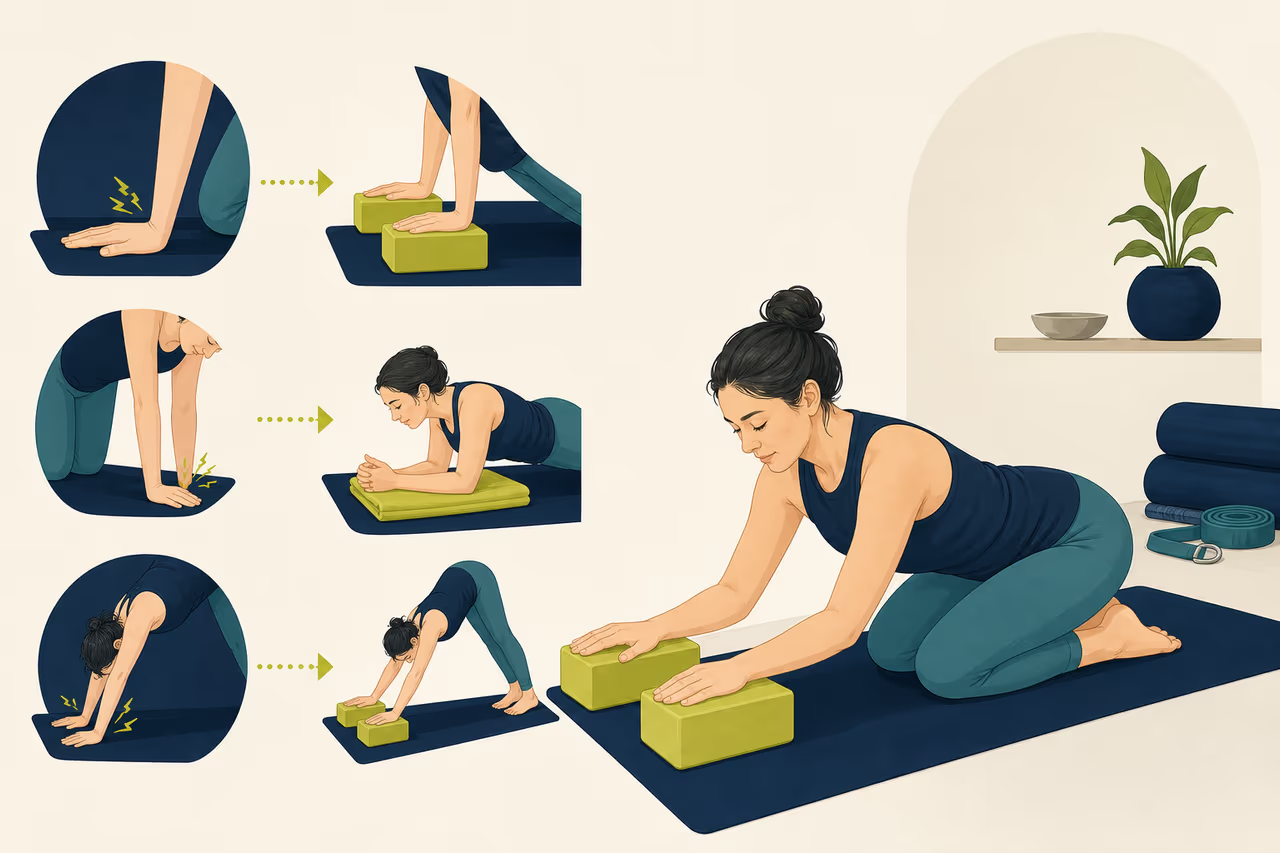
- Ask about equipment: Confirm if the studio provides blocks, wedges, or bolsters. These props can be used to change the angle of the wrist or elevate the hands, which can significantly reduce pressure.
Communication and modifications
Even in a well-chosen class, you are your own best advocate. If you feel discomfort, do not attempt to "push through" the pain, as this can lead to further irritation.
Communicating with your instructor
Arrive five minutes early to introduce yourself. A simple, direct statement is best: "I have some wrist sensitivity, so I will be modifying any poses that require me to put weight on my hands." Most instructors appreciate this heads-up and will be happy to offer alternatives.
Practical modifications
If a pose feels too intense, you can:
- Use blocks: Placing your hands on blocks instead of the floor can change the angle of your wrist, keeping it in a more neutral, stacked position.
- Use your forearms: In poses like Plank or Downward Dog, try dropping to your forearms (Dolphin pose) to remove the pressure from the wrists entirely.
- Stay upright: If a transition is too taxing, simply remain in a standing or seated position until the rest of the class moves on to the next sequence.
Wrist-Friendly Class Vetting Checklist
Use this checklist to navigate your next booking and ensure the class aligns with your physical needs.
- Search for classes labeled "Chair Yoga," "Restorative," or "Standing Yoga."
- Contact the studio to ask if the instructor is comfortable providing modifications for wrist sensitivity.
- Confirm if the studio provides blocks or wedges to change wrist angles.
- Arrive 5 minutes early to introduce yourself to the teacher and state your wrist limitations.
- Identify your "neutral" fallback position (e.g., standing or seated) before the class starts.
Trade-offs to consider
Wrist-friendly classes may offer less upper-body strengthening than traditional vinyasa, which focuses on arm-balancing and push-up movements. Finding the right instructor requires more upfront research than walking into a random studio. Prioritizing joint health ensures your practice remains sustainable and enjoyable over the long term.
Sources
- Yoga: Effectiveness and Safety (opens in a new tab), National Center for Complementary and Integrative Health.
- Older Adult Activity: An Overview (opens in a new tab), Centers for Disease Control and Prevention.
Watch alongside this guide
Accessible yoga for every body
This class demonstrates chair and support options that make the article's accessibility principles easier to see in practice. Source: Vancouver Coastal Health. This optional video is context, not evidence or personal instruction.
The YouTube player stays unloaded until you choose to watch. Loading it connects to YouTube and may allow that service to process usage data.